How to Take a Screenshot of a Long Webpage on Mac?

Capturing screenshots is one of the most common tasks for Mac users. Whether you’re saving online receipts, documenting web content, collecting research materials, or sharing information with colleagues, screenshots provide a quick and convenient way to preserve what you see on your screen.
However, standard screenshot tools on macOS are designed to capture only the visible portion of a webpage. When dealing with lengthy articles, product pages, social media feeds, or online documentation, users often need a way to capture the entire webpage instead of taking multiple screenshots and stitching them together manually.
In this guide, we’ll cover several methods for capturing long webpages on a Mac and discuss a more comprehensive solution for saving webpages in their entirety.
1. How to Take a Screenshot of a Long Webpage on Mac
Method 1: Use Safari’s Built-In PDF Export
Safari doesn’t provide a direct “full-page screenshot” button, but it offers an easy way to save a complete webpage as a PDF.
Passos:
Open the webpage in Safari > Click Arquivo > Exportar como PDF > Choose a save location and click Salvar .
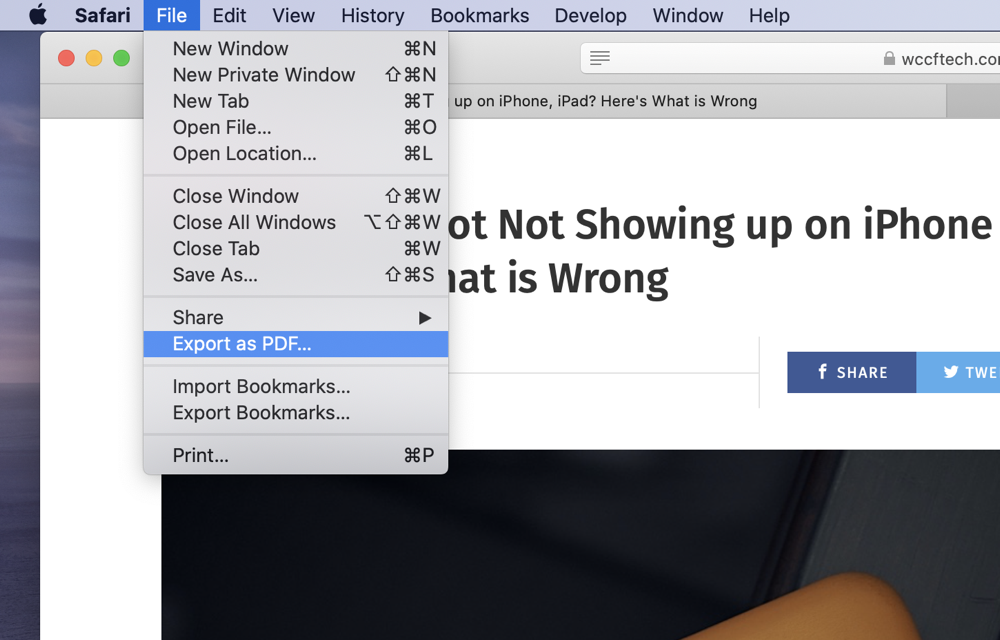
The resulting PDF contains the full webpage, including content that extends beyond the visible screen.
Prós :
- Built into macOS.
- No additional software required.
- Preserves text and layout.
Contras :
- Saves as PDF rather than an image.
- Some webpage formatting may change.
- Interactive content may not work properly.
Method 2: Use Google Chrome’s Full Page Screenshot Feature
Google Chrome includes a hidden feature that allows users to capture an entire webpage as an image.
Passos :
Open the webpage in Chrome and press Command + Option + I to open Developer Tools > Press Command + Shift + P > Type Capture full size screenshot and then select the command from the menu.
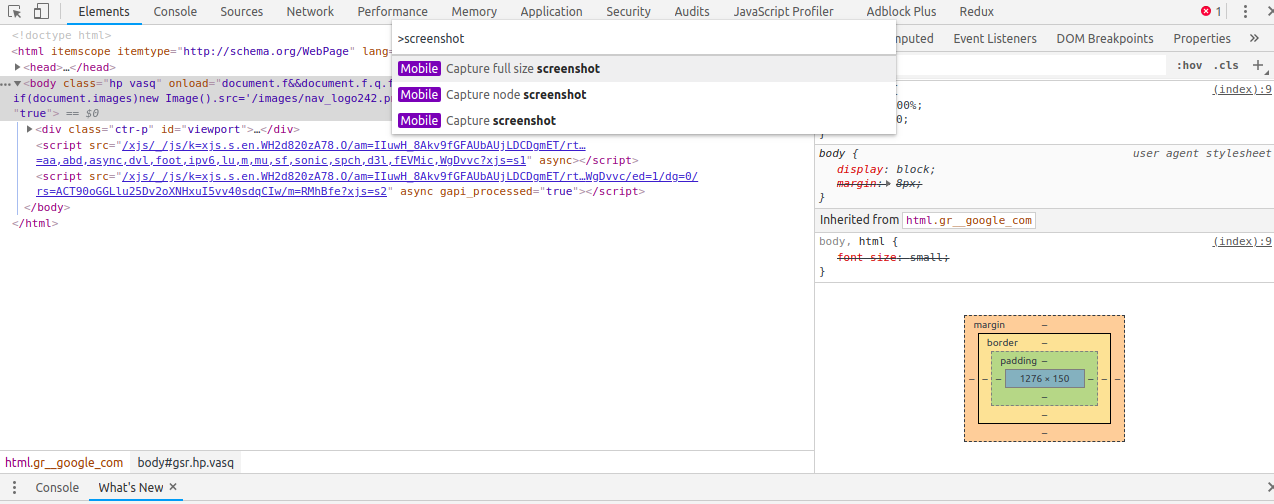
Chrome will automatically capture the entire webpage and save it as a PNG image.
Prós :
- Produces a true full-page image.
- No browser extensions needed.
- High-quality output.
Contras :
- Not easy to discover.
- Requires accessing Developer Tools.
- Large pages may produce very large image files.
Method 3: Use Firefox’s Built-In Screenshot Tool
Firefox provides one of the simplest methods for capturing long webpages.
Passos:
- Open the webpage in Firefox and right-click anywhere on the page.
- Selecione Take Screenshot , então clique Save Full Page and save the screenshot.
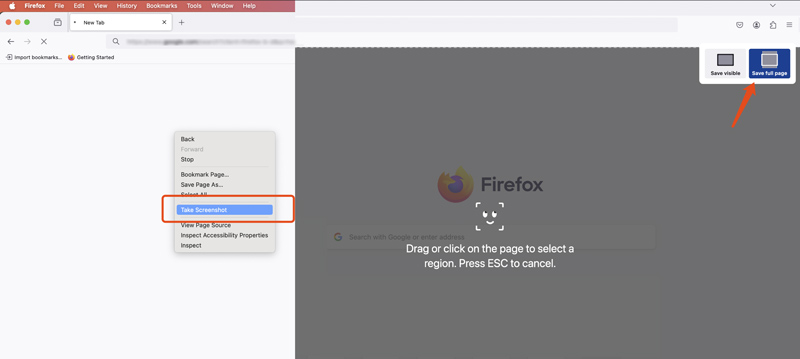
Firefox automatically scrolls through the page and generates a complete image.
Prós:
- Extremely easy to use.
- Built directly into Firefox.
- Captures entire pages with one click.
Contras:
- Requires Firefox installation.
- Large webpages can generate large files.
Method 4: Use Screenshot Extensions
Several browser extensions specialize in capturing full-page screenshots.
As opções mais populares incluem:
- GoFullPage
- Captura de tela incrível
- Nimbus Screenshot
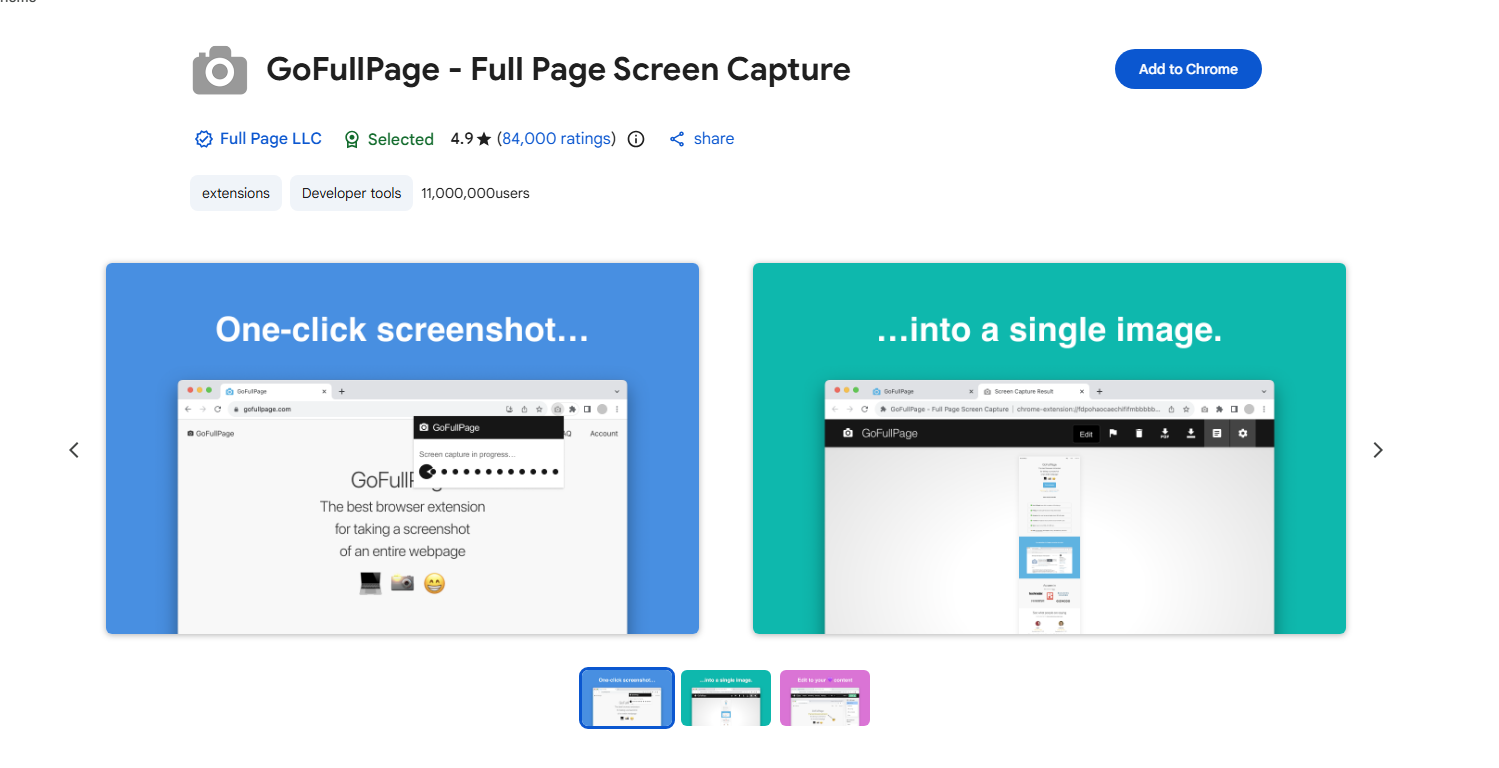
These extensions typically add a toolbar button that automatically scrolls through the webpage and captures the entire page.
Prós :
- Convenient one-click operation.
- Additional annotation tools.
- Supports multiple browsers.
Contras :
- Some features require paid subscriptions.
- Browser permissions may raise privacy concerns.
- Results can vary depending on webpage complexity.
Method 5: Use Third-Party Screenshot Applications
Dedicated screenshot software often offers advanced capture capabilities.
Examples include:
- Pegadinha
- CleanShot X
- Shottr
These tools can capture scrolling webpages, annotate screenshots, and export images in various formats.
Prós:
- Professional-grade features.
- Annotation and editing tools.
- Better control over output quality.
Contras:
- Additional cost.
- Requires installation and setup.
2. Archive a Page with ArchiveKit Instead of Screenshoting on Mac
While screenshots are useful for preserving visual content, they are not always the best solution. A screenshot is essentially a static image. Once captured, you cannot interact with links, search text, copy content easily, or preserve dynamic webpage elements.
For users who need to save webpages for research, documentation, compliance, offline viewing, or long-term storage, webpage archiving provides a much more powerful alternative.
ArchiveKit is a webpage archiving tool designed to save complete webpages for offline access. Instead of capturing a simple image, ArchiveKit preserves webpage content, allowing users to revisit pages even when they are no longer available online.
ArchiveKit helps users:
- Batch archive complete webpages as they appear online.
- Live browser mode to visit content on logged-in webpages.
- Highlight important text for easier review and research.
- Read articles in a clean Reader Mode
- Easily search and manage archived pages.
- Update saved pages when websites change.

3. Conclusão
Taking a screenshot of a long webpage on a Mac is easier than ever thanks to built-in browser features, browser extensions, and dedicated screenshot applications. Whether you choose Safari’s PDF export, Chrome’s full-page screenshot tool, Firefox’s built-in capture feature, or a third-party solution, you can preserve entire webpages without manually stitching multiple screenshots together.
However, screenshots remain limited because they only capture a static image of a webpage. They don’t preserve links, searchable text, dynamic content, or the original browsing experience. If you want to save webpages for future reference, archiving them is usually a better option than capturing screenshots.
ArchiveKit provides a more complete way to preserve web content by saving entire webpages for offline access. With features like batch webpage archiving, Live Browser Mode for logged-in content, Reader Mode for distraction-free reading, text highlighting for research, and powerful search and organization tools, ArchiveKit goes beyond what traditional screenshots can offer. If you frequently save important online content on your Mac, ArchiveKit is a smart and efficient alternative that helps ensure valuable information remains accessible whenever you need it.