Um guia passo a passo sobre como gravar vídeos em 4K no Mac

Em uma era em que o conteúdo em vídeo é rei, a gravação de tela se tornou uma ferramenta essencial para educadores, gamers, demonstradores de software e criadores de conteúdo. Mas se você quer garantir que suas gravações tenham uma aparência nítida e profissional, a resolução 4K é a escolha certa. Com quatro vezes mais pixels do que o Full HD, as gravações de tela em 4K oferecem clareza e detalhes superiores — perfeitas para as telas de alta resolução atuais. Se você é um usuário de Mac e está se perguntando como gravar sua tela em 4K, este guia passo a passo explicará tudo o que você precisa saber.
1. O macOS pode gravar em 4K nativamente?
Sim, macOS pode gravar tela em 4K , mas com um porém: a resolução da sua tela importa. Se a tela do seu Mac (ou monitor externo) for compatível com 4K ou superior, a gravação nativa corresponderá a essa resolução.
2. Pré-requisitos para gravação de tela 4K no Mac
Para garantir que você esteja realmente gravando em 4K, alguns requisitos técnicos devem ser atendidos:
- ✅ Uma tela 4K ou Retina (iMac, MacBook Pro ou monitor externo 4K)
- ✅ Espaço em disco suficiente (vídeos 4K são grandes)
- ✅ Um Mac de alto desempenho (chips M1/M2/M3 recomendados)
- ✅ Um gravador de tela compatível com 4K
Para aproveitar o 4K, sua tela deve suportar resolução de 3840×2160 ou superior. Os modelos mais recentes de iMac, MacBook Pro com tela Retina ou Macs conectados a um monitor externo 4K se qualificam.
3. Grave a tela do Mac em 4K usando ferramentas integradas
3.1 Gravar tela do Mac 4K usando o QuickTime Player
O QuickTime Player é uma ferramenta de mídia nativa da Apple que inclui recursos básicos de gravação de tela.
Passos:
- Defina sua tela para 3840×2160 (4K) e abra Reprodutor QuickTime de Aplicações.
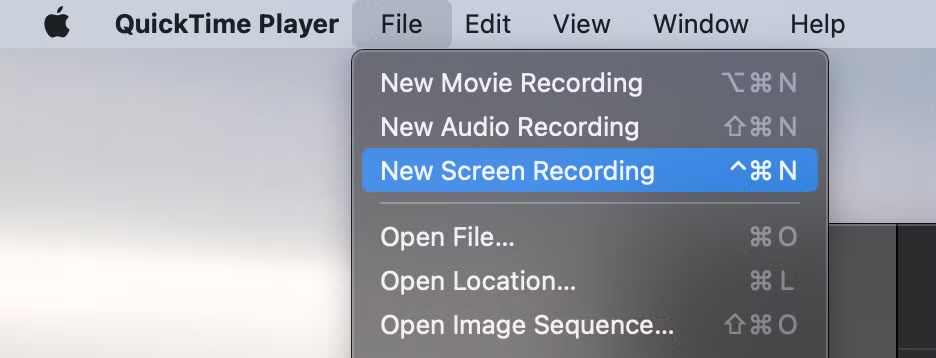
- Vá para Arquivo > Nova Gravação de Tela > Clique no menu suspenso para selecionar um microfone (se necessário)
- Clique Registro para capturar a tela inteira ou uma parte selecionada
- Clique Parar na barra de menu quando terminar.
3.2 Gravar tela 4K do Mac usando a barra de ferramentas de captura de tela
Você também pode usar a barra de ferramentas nativa de captura de tela do macOS:
- Certifique-se de que sua tela seja 4K e pressione Cmd + Shift + 5
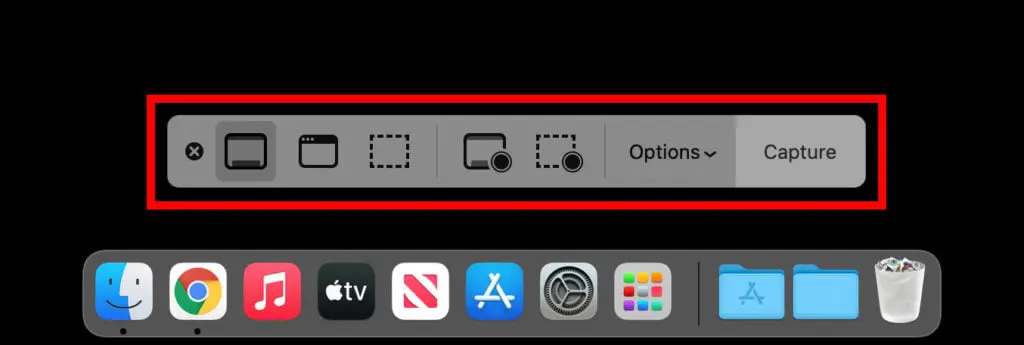
- Escolha se deseja “Gravar tela inteira” ou “Gravar porção selecionada”
- Clique Opções para selecionar dispositivos de entrada e salvar o local
- Clique Registro para começar e usar o ícone de parada na barra de menu para terminar.
3.3 Limitações das Ferramentas Nativas
Embora gratuitas e fáceis de usar, as ferramentas integradas do macOS têm várias limitações para gravações profissionais em 4K:
- ❌ Nenhum controle de resolução explícito
- ❌ Sem sobreposição de webcam
- ❌ Configurações limitadas de entrada de áudio
- ❌ Sem ferramentas de anotação ou edição
- ❌ Não há capacidade de compactar ou converter formatos facilmente
Se você precisa de melhor controle e mais recursos, aplicativos de terceiros são a melhor opção.
4. Grave a tela do Mac em 4K usando o OBS Studio
O OBS Studio é uma opção gratuita popular para gamers e streamers, com controle total sobre resolução, taxa de bits e áudio.
Passos:
- Obtenha o OBS Studio em obsproject.com e instale no seu Mac.
- Clique em “ + " sob Fontes > selecionar Captura de tela > escolha sua exibição.
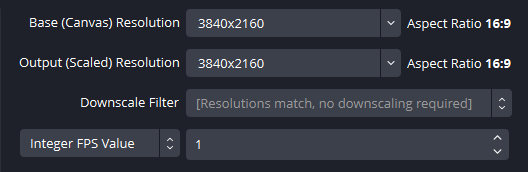
- Vá para Configurações > Vídeo , defina: Resolução base (tela): 3840×2160; Resolução de saída (dimensionada): 3840×2160; Defina FPS como 30 ou 60.
- Vá para Configurações > Saída para definir uma alta taxa de bits (em torno de 20.000–40.000 Kbps) para uma qualidade 4K nítida a 30–60 FPS.
- Assim que a exibição e as configurações estiverem prontas, basta clicar Iniciar gravação , execute sua atividade na tela e clique em Parar a gravação quando terminar, o vídeo 4K será salvo automaticamente no local escolhido.
Prós:
- Grava em 4K a até 60 fps
- Gerenciamento avançado de cena e fonte
- Suporta sobreposições, transições e transmissão ao vivo
Contras:
- Curva de aprendizado mais íngreme
- Interface de usuário complexa para usuários casuais
5. Grave a tela do Mac 4K sem esforço usando Recordit
Para quem quer o melhor equilíbrio entre simplicidade e qualidade, Recordit é a melhor escolha. É um aplicativo de gravação de tela limpo e intuitivo para Mac que suporta captura de vídeo em 4K real, sobreposições de webcam e entrada de microfone — tudo isso sem exigir uma curva de aprendizado acentuada.
Principais características de Recordit :
- Gravação de tela 4K com um clique
- Capturar tela cheia ou região personalizada
- Suporta microfone e áudio do sistema
- Sobreposição de webcam (opcional)
- Exportação rápida em formatos comuns de vídeo/áudio (MP4, MOV, MP3)
- Capture capturas de tela de alta qualidade
- Interface limpa, uso mínimo da CPU
Etapas para gravar tela 4K no Mac com Recordit :
- Baixar e instalar Recordit Versão para Mac no site oficial e configure o software.
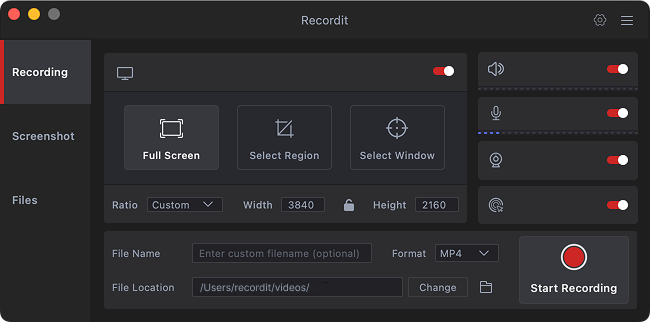
- Lançar Recordit , defina a resolução para 3840×2160 (4K) , então personalize mais opções de gravação, como áudio, formato de saída, efeito do mouse, etc.
- Selecione a região de gravação e clique Começar Gravação , execute sua atividade na tela e Recordit capturará sua tela em tempo real.
- Clique Pare de recriar , então navegue até o software “ Arquivos ” para visualizar seu vídeo.
6. Conclusão
Gravar a tela do seu Mac em 4K não precisa ser complicado. Seja usando as ferramentas integradas do macOS para capturas rápidas ou softwares mais avançados como o OBS Studio para vídeos de nível profissional, obter gravações 4K cristalinas está ao seu alcance — desde que você tenha a configuração e a resolução de tela corretas.
No entanto, se você está procurando um equilíbrio perfeito entre potência e facilidade de uso, Recordit se destaca como a melhor opção. Com sua interface intuitiva, captura 4K com um clique, suporte para webcam e áudio e opções de exportação rápidas, Recordit torna a gravação de tela de alta qualidade acessível a todos — sem curva de aprendizado acentuada, sem complicações técnicas. Se você deseja produzir vídeos 4K nítidos e refinados no seu Mac sem sobrecarga, Recordit é a ferramenta ideal na qual você pode confiar.